Sunday 28 August 2022

Auger Close, Hartlip

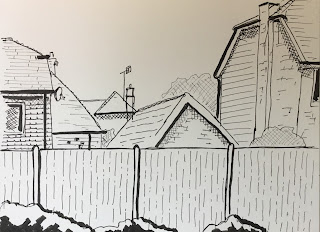
And here's the final dash and splash of the day.  I didn't have to dash very far after drawing it as it's a view from my back garden, albeit with some distracting stuff on this side of the fence removed.  It's a new view, only visible now that the two trees that used to obscure it have both been taken down.  I'm not sure whether that's four or five houses but it's an interesting collection of shapes.

The drawing was pretty straightforward, again giving me lots of opportunities to use that really thick pen.  I'm getting to be a big fan of gutters and drainpipes.  And I really enjoyed marking out those planks on the fence.

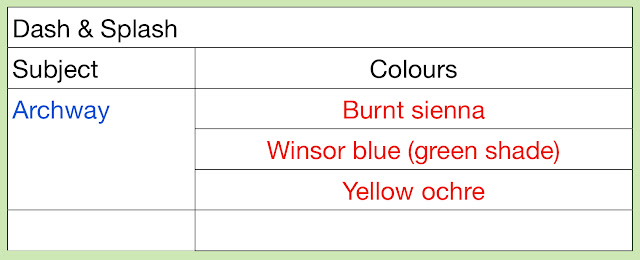
And what colours does the computer choose?
Now that's a great choice of colours.  There's a red at last, along with an earthy yellow which will make lots of understated oranges for brickwork.  And the green, as well as looking good in trees, could create some interesting neutrals with the red.  There's no blue, but I'm not normally one for blue skies, let's be honest.

And I just went in and put down those colours.  More than in any other painting today, I was charging in colours wet into wet to make things interesting.  Look at those bits of green in the closest houses on the left and the right.  And how I've varied the colours along the fence and left the odd white gap.  I can do these this when I've been given the right colours.  Maybe I need to revisit my random colour strategy and make it a little bit less random or lump browns and secondaries together so that the computer can only pick one of them.  I need to think some more.  Oh, and the sky was great fun: just the red and the yellow allowed to mix, with the red generally nearer the top.

Anyway,  this one definitely works.  It's the best of the day and is up for sale.

Archway To Hartlip Church, Dashed And Splashed

The plan was to do three dash and splashes today but we had an early dinner and I had to head home after doing two drawings.  After lunch, I went out again but ready to do another two, making a total of four for the day.  I headed for Hartlip Church and wandered around looking for inspiration before deciding to have another go at the archway after painting it here and here.

This was the only time today when I put down some pencil guidelines to help with the drawing.  All the other three subjects were based on straight lines and I felt more confident putting these down in pen.  But for the archway I needed to think of too many things at once while drawing, so went for the pencils and had two or three attempts before getting something acceptable.  While drawing, I was keen to get lots of detail into the arch and very little into the church and I'm glad to see I stuck to the plan.  I think I made good use of the thickest pen here, putting down some large cracks in the archway and some foliage silhouettes in the foreground.  It's as if I'm wanting the pen drawing to be able to stand as an artwork in its own right.  In fact, I'm probably going too far down that route: I'm not sure I need all that crosshatching in the tree shapes.

But what did the computer have to say about colours?  Here are the colours it chose:
Now that's interesting.  A bright cool blue to add some energy, an earthy yellow that will really help with stonework and an earthy red that will again help with stonework but might also make a good earth colour when mixed with the blue.  A promising selection.

And, yes, they worked out well.  I got all the colours I needed and was enjoying this triad so much that I couldn't resist adding some random blues and burnt siennas to the archway in places.  This one worked out just fine and was later bought by my biggest local fan.

I'm not saying much about the painting stage in these dash and splashes.  It's because that splash stage really is one big splash.  It's over really quickly and I try not to think too much about what I'm doing.

Hartlip Village Hall

Next I wandered over to the village hall and found a comfortable place to sit and draw.  I might have put the village hall slightly too high on the page and ended up showing too much of the boring car park when I could have shown more of the sky instead.  It's also a bit awkward that the front of the building is in shadow: maybe I should have come at a different time of day.  But otherwise the drawing wasn't too bad.  I think I'm making good use of the variety of different thicknesses of pen available to me.

And now the exciting bit.  When I got home, the computer chose these colours for me:
French ultramarine and raw umber again but the sap green has been replaced with violet.  I'm effectively stuck with using the violet as my red and the raw umber as a yellow.  Some of the colours in this one will be interesting.

This ended up coming out a lot better than I thought it would.  I got some passable greens and made use of the purple in the roofs.  I was getting a bit frustrated with the hot pressed paper: paint seems to float in the top, reluctant to soak in.  Maybe I'll switch to cold pressed when I've finished with this pad of paper.  One thing I did try here was charging in more colour, dry into wet.  You can see where I've dropped some blue into those purple roofs.  Where I struggled a bit with this one was again in coming up with a good neutral colour: the colours still look muddy.  It's not great look to the front of the building.

This one's not going in the shop window.

Hartlip Methodist Church

I’ve had a busy day dashing and splashing around the village.  I just woke I up in that sort of mood.

I started by heading for the Methodist church.  Despite doing many paintings of the CofE church, I've never attempted Hartlip's other church.

I drew this one standing up by the side of the road.  I didn't start with a pencil outline, instead going straight for the pens, although I admit I did start with a thin pen and went over some lines later with thicker pens.  I added lots of shadows with crosshatching but the most enjoyable bit was going over the really dark shapes at the end with the thickest pen, one that's more like a paintbrush.  I think I ended up doing a pretty decent job.  There are some errors there but they're the errors that you'll only see if you compare the drawing to a photo, so I. Luke claim they're the result of applying artistic license.

Later on today, when I was ready to paint, I got the iPad to choose three colours for me:
It's not a great set of colours, looking like an analogous colour scheme with a blue, a green and a yellowy brown, all on the same side of the colour wheel with no red in sight.  On the other hand, I didn't really need a red, so I don’t know why I'm complaining.  I used the blue and the green but screwed u0 and used raw sienna rather than raw umber.  I wasn't concentrating enough.

Without red pigments in the colours, I struggled to get a decent looking colour for the shadows, which all ended up a bit muddy.  But otherwise, I think this turned out fine.  Decent drawing, decent use of the colours, some white highlights to keep things interesting and a suitably understated house in the background on the right.  A good start to the day.  This one's up for sale.

Friday 26 August 2022

Old Nuuk

Here we go then.  Back on the watercolours and it's a gentle return because I'm reaching for the tundra supergranulators and doing another painting based on a scene in Nuuk, the capital of Greenland.  This is in the old part of town where there are loads of multicoloured houses.  As well as the five tundra colours, ai used a little bit of French ultramarine, cadmium red and cadmium yellow.

I started by cropping down my source photo to something that I thought would make a good composition. Having the horizon one third of the way up the page meant that I could have a huge sky area where I the supergranulators could be allowed to to party.  I thought long and hard about whether to include the car.  I decided in the end to include it because the only way for me to get better at drawing cars us to stop leaving them out of paintings.  I made the car blue rather than the black in the source photo because I wanted a brighter colour than those in the tundra set but that would work with them.  French ultramarine was a no brainier as it was already included in the blue, pink and violet tundra colours.  For the main colour on the house I went for an understated green rather than the grey in the source photo because I wanted to make best use of the tundra colours.

So I draw on the outlines and masked out some whites then got to work.  The sky is made up of tundra blue, tundra violet and tundra pink.  The consistency of my sky washes is at just the right level to maximise granulation, so this was always going to look good.  There's some great granulation and storminess as in there and some interesting halos around buildings and along the horizon.

Next came the buildings.  I mixed some great colours here and I like the white edges along the roof and gables.  The edges of planks on the biggest shape came out really well - I had a good steady hand today.  The perspective's off in a few places but that just seems to be how I roll.

Then I painted in the snow.  I think I've been a bit heavy handed with this today, to keen to give the tundra pink, tundra violet and tundra blue plenty of exposure.  I should have left more white and applied much more watery washes.

Then I painted in the car.  This is where the French ultramarine came in (althoughI've timed it down by throwing in some tundra colours) and where I needed to use the cadmium red and cadmium yellow for the back light and number plate respectively.

Finally, I removed the masking fluid and added some very thin tundra pink in some of the white areas.  And I tinkered some more with the snow, making it look a bit dirtier than it should have done.

Overall, this one works and is going up for sale.  There's a nice feeling of an upward thrust from the house into the sky, which gives it a bit of energy.  The slightly dodgy perspective, where the house gets wider at the top, adds to this.  Next time, though, I should make the sky a bit lighter and the snow a bit cleaner.

Thursday 25 August 2022

JenH In Coloured Pencil

It was still raining today, so no watercolours.  Instead, I went for the experiment at the top of my list.  I know that angular figure drawing of people from behind in coloured pencil feels natural, suggesting that might become my coloured pencil style.  But I also know that this doesn't feel as natural when drawing portraits with coloured pencil.  Which begs the question how does it feel drawing people from in front using coloured pencil.  So I thought I'd give it a go.  Today's model is JenH, someone who worked out well from behind in an angular painting.

So I did all the usual things.  Put a drawing down first, cheating by using a grid.  Got some colour down quickly to mark out the shapes.  Then put on whatever colours I liked the look of and/or could detect in the source photo with my artistic eyes.  Then, when I thought I couldn't add any more colour, I burnished it over using cream, ivory, beige red and cinnamon, depending on how light or dark I wanted different parts of the body to be.  This is where things started going wrong.

The cream was too yellow.  I started with Jen's right arm and hated the way it came out, so used ivory instead of cream in all the lightest bits in the rest of the painting.  And the cinnamon felt a bit too dark today, masking out a lot of colour.  So for future paintings like this, my burnishing colours for flesh areas will be restricted to white, ivory and maybe beige red.  These will all be kind to my underlying impressionistic colours.

As for the experiment, angular figure drawing from the front doesn't feel unnatural but also not any more natural than drawing with curves.  I think angular front views in coloured pencil will only appear very occasionally on this blog.  Coloured pencil figure drawing will tend to be angular paintings from behind.

And finally, was the painting a success?  Well, the cream burnishing in the arm wasn’t great but isn't bad enough on its own to constitute a disaster.  That left hand, though, is a monstrosity, and the painting doesn't look right with the bottom cropped off.  It's a no from me.

Wednesday 24 August 2022

Neil Young In Coloured Pencil

I've had a couple of days off doing a bit of retirement planning but am back on the painting again now.  After discovering how my figure drawing style with the coloured pencils is to draw with straight lines and make everyone angular, I thought I'd have a go at an angular portrait with the pencils.  For subject matter, I went for the great Neil Young.  I've had a go at Neil before, without success.

What I did was to start by putting down a drawing made up mainly of straight lines.  Even the edges of all the shadowy shapes on the face we’re straight.  Only the pupils and irises I the eyes were allowed round edges.  The eyes are always exempt from the rules that govern the rest of the painting, as you might remember form the brown eyes of Rory Burns.

After the lines were down, I had fun colouring everything in with whichever colours I could see vague hints of in my source photo.  Once I thought I was pushing the paper,s limits, I went over and burnished everything.  I think it was green gold for the hat, sepia for the shirt and shadows and white for the mutton chops.  Where I had most fun, though, was on the face.  I burnished the face with cream in the lightest places, cinnamon in the darkest and beige red in the lightest.  All three were fleshy colours that toned down the impressionistic colours underneath but I liked how the use of three colours fought back a bit against the homogenisation that I might have got with one.

After the burnishing, I had a decent painting but it wasn't as angular as I'd wanted it to be.  Rather than stopping there, I went over some outlines, creases and face shape edges with straight lines.  For some reason I went with the helio blue reddish pencil that I already had in my hand rather than the sepia or indigo that I'd been intending to use but, hey, la-di-da.

I've ended up with something interesting and that's a vague likeness of  Neil.  The straight blue lines have, if anything, made the painting worse.  So I think this idea of angular portraits can be abandoned.  Angular figure drawing with the pencils feels natural, as if it's what the pencils want to draw.  But with portraits, using all those straight lines feels like swimming against the water.  Still, decent painting and it's up for sale.

Sunday 21 August 2022

Watercolour The Natural World: Tim Pond - Book Review

This should be interesting.  A book on painting the natural world, featuring lots of different flora and fauna in lots of different habitats.  It's a 144 page paperback with those bent in cover flaps that mean the corners won't get dog eared.  It looks really good just flicking through and I suspect it would make a great present for any watercolour artist who hasn't set up a wishlist.  But is it any good?

Structure-wise we have about 30 pages of general watercolour advice on equipment, brushstrokes, perspective, colour, values, etc.  Then there's about 10 pages setting the scene for the rest of the book, waxing lyrical about the wonders of nature.  And then there's the meat of the book with about 100 pages divided up into habitats and talking about the flora and fauna in those habitats with some stuff about painting them.

My spider sense started tingling in that first 30 pages.  First lot of the advice was pretty basic.  This was a theme that popped up throughout the book - did you know that the easiest way to find the centre of a square or rectangle is to join the opposite corners with straight lines and see where they cross?  But what really bit my hackles up was some of the bad advice in there.  Tim suggests practising watercolour painting on cartridge paper.  Cartridge paper!  He recommends artist use a set of 24 colours because the more colours you have the more mixing time you save.  Apparently with a set of 64 colours you risk losing coherence between the colours on the painting.  Absolute rubbish!  You start losing coherence at six or seven colours.  And there's no excuse for recommending the use of alizarin crimson in 2022.  Is there anyone reading this book that doesn't already know it's a fugitive colour?  Less controversial but still jolting was his overuse of black and his willingness to mix white with other colours.

Some of Tim's explanations were a bit too narrow for my liking:
- his explanation of copying a photo using a grid is restricted to copying 12x12cm photos onto 12x12cm paintings and only with 2x2 grids.  I'm sure readers will be smart enough to figure how to extend this to different sizes, magnification/shrinking and different numbers of cells but Tim's instructional style suggests his is the only way
- and apparently an underpainting can only have one colour.
I've clearly been stretching some boundaries.

The middle section was a bit waffly and totally at odds with Tim's claim to have "endeavoured to ensure that every page in this book is packed with handy tips, techniques and critical concepts".

And then there were the last 100 pages.  They were packed with Tim's paintings but I found these to be a bit too sketchy to be inspirational.  Most of the information in these pages were just David Attenborough-style tidbits, just one for each animal alongside a sketchy painting.  For animals described in more detail, we had drawings of their skeletons and sometimes muscle systems but with nothing about how this might help us paint that particular animal.  Every skeleton was annotated with "Knowing the bones can give your drawing structure and the feeling that the legs are supporting weight".  Every one!

There were quite a few short demonstrations (typically four steps) but I wasn't impressed by these.  They were instructional rather than demonstrative ("do this rather than "I did this") which always grinds my gears.  And the instructions were pretty useless.  I'd rather have seen two or three steps spent on how to draw the animal (and to divide it into shapes) than have step 1 draw the animal, step 2 add a French ultramarine underpainting, step 3 add more colour, step 4 add dark details.  It was the same four steps time and time again, with nothing animal-specific.  And there were a couple of demonstrations where I'm pretty sure it wasn’t the same painting in every step.

Amid all these factoids and demonstrations there was the occasional animal-specific tip but these were far too rare and deeply buried for my liking.  They were too easy to miss.

There was also some stuff in there about temperate regions like the one I live in.  For these regions, Tim didn't just talk about flora and fauna but also about the four seasons.  But there's not much useful there.  There are paragraphs headed the spring/summer/autumn/winter palette but when you read these, they just talk about things like "the dark blue and jade green of the summer sea, washing up on a yellow sandy beach, vivid oranges, poppy reds" with nothing about which watercolours in the palette might be able to replicate those colours.

What about writing style though?  Well Tim clearly has a passion for the natural world.  This comes through loud and clear in his reluctance to talk about painting.  I do wonder, though, how much of this he's making up after reading him describing New Zealand as an island.

And, finally, something I've never commented on before when reviewing books: writing ability.  Thinking back through the book, I was shocked by:
- Tim not knowing the plural of hippopotamus
- his explanation of the difference between biomes and ecosystems, which made no sense and left me none the wiser
- substituting "however" for “but" as if they're synonyms, which they're not.  One's an adverb; the other’s a conjunction
- clunky sounding sentences resulting from using the same word more than once
- clunky sounding sentences resulting from using the words in the wrong order.  I can't find where it's is but there's something like "Some animals can do this, such as the …" when "Some animals such as the ... can do this" would have sounded much better
- a bit of clunkiness that I can actually find: "Geese are divided into two main groups: the grey geese… and the black geese…".   Come on!  Either leave out "the" in two places or replace geese with goose in two places
Maybe this is the all the editor's fault rather than Tim's but I felt as if I was holding a shoddy product.

It's a tough call over whether to give this book one palette or two.  It's badly written and badly edited.  It contains bad advice.  It misses some great opportunities to teach the reader something.  Ok, it looks good on the shelf and has lots of interesting factoids.  If there was some inspirational artwork in it, that might make me veer towards two palettes, but there isn’t and I'm just left feeling annoyed and that I've let down the people that bought me this book by putting it on my wishlist.  It's a one paletter.

🎨

Oh, and I've removed Tim's other book from my wishlist, the one on drawing and painting animals.  There are reviews on Amazon that describe it as a natural history book and, after reading this one, I'm inclined to believe them.  For painting animals generally, I'd recommend the Jean Haines book and, for how to draw and paint particular animals, the Jack Hamm book.

Saturday 20 August 2022

Blast Wall, Glazing House, Oare Gunpowder Works

I took a trip out today to Oare Gunpowder Works Country Park near Faversham.  It's a forest with lots of walks through it, along with a private fishing lake and the ruins of some old gunpowder works.  After taking a stroll around, I thought I'd start with this view.  That's not a bright but the remains of a wall that had an archway in it, allowing a stream to pass the glazing house inside the blast walls.  I'll definitely be coming back: there are plenty of interesting views there.

There was a lot of greenery about so I thought I'd give the Shire supergranulating colours a go, along with cerulean blue and rose dore.  Sepia and titanium white made an appearance at the end.

After sketching out the main shapes, masking some trees and spattering some masking fluid, I got to work with the watercolours.  I started with an underpainting today and ended up painting over multiple coats: if I put the paint in too thick, it won't granulate, so I kept my individual layers quite thin.  At some point I removed the masking fluid from the trees but I was careful to add big green shapes both before and after removing the mask so that they appeared both behind and in front of the trees.

Once I thought that adding more layers would only make things worse, I added some detail using the two opaque paints: highlights in opaque white and some shadows, branches and bricks in sepia.

The end result is mixed.  There are some interesting green shapes in the trees and the rose dore is doing a great job both toning down the greens and vibrating against them in the trees and the wall.  But the archway's not quite the right shape and the two banks in the foreground don't really work for me.  And I'm starting to reach the conclusion that the Shire supergranulators just don't work for trees and should be kept for rolling fields. I won't be putting this one up for sale.

Friday 19 August 2022

Cammie

The weather wasn't looking good today so I stayed indoors.  After a run of straight edged figure drawing s with the coloured pencils, I'm back to painting curves with the inktense pencils.  Today's model is Cammie, making her debut.

I went a bit overboard with the colours today, starting with willow, leaf green and mustard and intending to throw in a little bit of blue or red at the end but ended up using baked earth, apple green, teal green, sea blue, bright blue, deep indigo, fuchsia and poppy red and not holding back on any of them.  Coloured pencils have got me into bad habits, applying too many layers of too many colours.  I even fel5 as I& ai was reaching the maximum capacity of the paper for colour in some places.

I've ended up with something where the colours don't really work together.  And where Cammie's right arm looks deformed until you realise it's because that's her (too visibly prominent) backbone and not the edge of her arm.  And I had a problem with the indigo drying too quickly, leaving me with some ugly looking thick blue edge lines in places.

Let's put this one down as a flop.

Thursday 18 August 2022

JenH

I headed out to my local Hobbycraft yesterday to do some shopping.  I bought replacements for seven or eight colours that seem to be shrinking down fast and bought some new colours, expanding my collection to a little over 50.  But, most inportant of all, I bought some heavier paper to use those pencils on.  I couldn’t find the three types of paper that I was looking for (and have since forgotten what they were) but I did remember that watercolour paper can be pretty good with coloured pencils.  I made sure the paper was chose was acid free but wasn't fussed by the cotton content.  In the end I went for some cheapish paper by Seawhite of Brighton.  It felt thick enough and was in a spiral bound book with hard covers, which I liked.  It was cold pressed rather than the (smooth) hot pressed paper that I'd seen some people preferring but I liked the feel of the cold pressed. There's more texture there and I like that.  Maybe I'll try cold pressed at some point.

The subject today was JenH, making her debut.  I've gone again for a back pose and a drawing made of straight lines.  Front views and curves work best with the inktense pencils, which are more forgiving if I get things wrong.  With straight lines and a back view, it's much harder to come up with a drawing that looks wrong.  So this may be the way I go with the coloured pencils, although I'm also going to come back to portraits at some point.

As usual, most of the pencil marks went down using the edge of the pencil tip.  I put on as much colour as I could before getting to the point where the paper wouldn't accept any more, and by this time ai'd put down enough to make things interesting.  Then I burnished it all over by going over everything with the point of a pencil: a grey for the hair and a light flesh colour (I think it was ivory, one of my new ones) for the body.

And it's another good one, and is going up for sale.  It's hard to go wrong with paintings like this.  My next figure drawing, though, will be with the inktense pencils - I need to practice curved lines.

Oh, and on a separate subject, I think it's the kneadable eraser itself that's been giving me problems with smudges.  I've thrown it away now and am going back to the Faber Castell version.

Wednesday 17 August 2022

KathyB

It's an indoor job today while I wait for the rain to arrive.  I thought I'd have another go at a figure drawing with the coloured pencils, again with a model facing away from me and with lots of straight lines.  Today's model is KathyB, making her debut.

There's not much to say about how I put this one together, must of it being along the same lines as Charlie's Back.  The only real difference was that I held off for even longer before using the points of the pencils, only using the edges of the leads.  After doing this, I think I now understand the limits of how much colour the paper can take on.  I'm going to be upgrading to heavier paper at some point this week.  As well as being short of colour capacity, this paper can be smudgy when rubbing out the pencil lines - there's a smudge on this one, just above Kathy's head.

I think this one's a success.  I'll definitely be continuing to use the edges of pencils to add layers on figure drawings going forward.  Saving the points of the pencils for a bit of burnishing at the end and maybe some linework and detail.   So this one's up for sale.  I really want to see how this works out on heavier paper though and to understand whether the paper's holding me back or masking my deficiencies.

Saturday 13 August 2022

Hazel Soan's Art Of The Limited Palette - Book Review

 
This is one gorgeous looking book.  It's a 192-page hardback and the name of the book in the top right has been embossed.  I can't stop running my finger over it.

The book's all about limited palettes (obviously), a subject close to my heart.  In theory about half the book is background and theory, so what's so good about limited palettes, what the choice of colour will do for the painting and how to choose the colours.  Then the second half is all about practice, with examples from landscapes, sunsets, seascapes, buildings, flowers, portraits and wildlife.  But actually it all blended into a long story for me, maybe because there wasn't much in the first half that I didn't already know, so the book ended up as just one long set of examples.

But those examples are fantastic.  So many of them, all inspirational.  All of them detailing Hazel's thought process about which colours she used and why.  In some places, Hazel gives pairs of examples with slight differences in colour so you can look at the differences.  There are a few demonstrations too, mercifully short and worded as demos and not instructions; they were actually quite good at breaking things up a bit and not letting me rush through the book too quickly.

While I didn't learn much from the book, I did learn some interesting stuff about how one colour in the palette can make other colours pop.  Like how having a really cool blue makes all the other colours look warmer, that sort of thing.  But I had lots of the ideas I've picked up through experience confirmed and I can see how someone less experienced would learn a lot from this book.  I think a bit of experience is useful, though, when you're reading about Hazel's colours.  When she uses yellow ochre, for example, I'm not only translating that to the raw sienna that I use but also remembering that raw sienna is more transparent, so won't give exactly the same effects.  Hazel uses Schmincke colours, by the way, but that's not a big deal.

Writing style is sparse, but that's a good thing in this book.  So much of what Hazel has to say is through her example paintings rather than through words.  Not many words are needed to make the point and the time saved reading can be spent on looking at those paintings to put the words into context.  And Hazel's voice and passion come through loud and clear.

I guess this book will always be compared to Hazel's Watercolour Rainbow, so I should say something about the two books.  I think Limited Palette is a bit more advanced.  I'd go for Watercolour Rainbow quite early into someone's career, maybe when they're just going for professional colours for the first time and planning their palette.  If they're already past that stage, Watercolour Rainbow is still good but better if they use Winsor & Newton than if they use other brands of paint. Limited Palette is good whichever brand of paint you use but I'd wait until someone had been painting for two or three years before getting them this book.

Time to start bringing things together.  I think this book is essential to all watercolour artists.  Yes, I said essential.  Apart from this website (Brent mused) this book is the only place I've seen limited palettes get the attention the deserve.  This feels like one of my shorter reviews but, honestly, this book is so close to perfect that there's not much to say.  Five palettes.

🎨🎨🎨🎨🎨

Friday 12 August 2022

CharlieK's Back

I won't be going outside to paint during this latest heatwave, so I'm back on the coloured pencils and doing some figure drawing: my first go with the coloured pencils at something other than a portrait.  Today's model is CharlieK, making her second appearance.

As I was putting down a pencil outline, I noticed everything was quite angular, so decided to only use straight lines for the outline, albeit quite short straight lines in places like the toes.

For a long time, the only colours I put down were with the edge of the pencils rather than the point and going for the dark and earthy colours first, so today that was raw sienna, walnut brown and black.  This is how the filling out stage is going to work for me. To distinguish the left arm from the torso, I put some red in the arm and blue in the torso, and that naturally led me to putting some reds, blues and greens wherever I felt like it all over the body.

Next I moved on to the pointy bit of the pencil, going over the hair and all the dark shadowy areas.  For the hair, I was especially careful about the direction of the scribbles, trying to always go in the direction of the hair no add some texture.  Then a few more reds, blues and greens with the edges of the pencils to catch up a bit on all those dark areas.  Then I burnished over everything in white.

Finally I did a little bit of tinkering.  I added a little bit more red, green and blue.  I went over the edges of the hair shape with black pencil, making sure all the edges were straight lines.  And I added some faintish straight black outlines around body shapes.  And then I was done.

And I'm pleased with the outcome.  The straight edges work really well.  So does the directional scribbling in the hair.  Maybe some of the shadowy shapes on the body are a bit straight/hard edged but I'm not sure whether that's a good or a bad thing.  And I think next time I'll hold off on the pencil points for longer, maybe doing everything with the sides of the leads and only using the points for burnishing at the end.  Anyway, this one's up for sale.

Thursday 11 August 2022

Candle

Back on the inktense pencils today.  Got to keep all those plates spinning.  Today's model is Candle, making her debut on theses pages.  Colours were deep indigo, bright blue, fuchsia, poppy red, leaf green and mustard.

I started with indigo in the darkest places, then moved onto the blue and red.  I put red on the left facing lines and blue on the right facing.  The green and fuchsia I put wherever I fancied and the mustard in the brightest areas.  Finally I added a little red over the blues and blue over the reds, just to get the blues and reds closer to each other and not let things get too garish.

After putting all the pencil down, I ended up with this
Things look good at this stage.  I'm wondering whether I should try some figure drawing with the coloured pencils.  From a selfish point of view, this would relieve all my frustrations about having to stop earlier with the (inktense) pencils than I'd like to.  On the other hand, I'd be frustrated to hell about not being able to dilute the pencils with water at the end.

Anyway, this was in inktense pencil, so I diluted the pencil marks and ended up with the painting that yo7 see at the top of this posts.  If I was to be picky, I might wonder about how red the right nipple was, how little green there was in the thin shape at the top of the right thigh and about how things look a tiny bit out of proportion (bottom half looking big relative to top) but I'm happy overall and this is going up for sale.

In the words of the great David Brent, this is me on a seven.

Tuesday 9 August 2022

Bodin Church, Norway

My friend Cathy, who takes more photos that would make good paintings than anyone I know is currently enjoying a holiday in the frozen North and posting photos every day onto Facebook.  A couple of days ago, she put up a photo of this church in Bolø and I couldn’t keep my hands off it.  It's a white church, so was crying out to be painted in French ultramarine, quinacridone magenta and transparent yellow (the key of purple cool).  Titanium white also made an appearance for some highlights at the end.  You know it's been a good day for colours when your brush-drying white sock stuffed with toilet paper comes out looking like this:

After getting down a pencil outline, I started by putting on some masking fluid.  Today I negatively painted the sky so that sky colours couldn't leak onto the church.  I also masked out some of the bars in the windows and some holes in the tree on the right for the sun to show through.

 Next was the sky (just blue and red) and then the trees on the left (blue and yellow but with some red to tone down the trees.  And then came the exciting bit.  After removing some of the masking fluid, I put down an underpainting on all the dark shapes, being careful to put in the colours that I could see in the source photo.  I also started with some of the impressionistic colours on the white walls.  Here's what the painting looked like thus far.  I have to say that underpainting in the darks was looking really professional, like a Peter Cronin underpainting:

The most difficult bit of this painting was glazing a neutral colour over the dark areas.  I had to get the consistency exactly right: too watery and the underpainting would be too prominent, too thick and the underpainting would be hidden.  I think I got the neutral one the spire right but that on the roofs is slightly thicker than I'd have liked.

The rest of the painting was worked from back to front: the church, then the trees on the right, then the foreground.  The gaps in the tree worked out really well and it was a smart move in my part to have a gap in the middle of the foreground greenery rather than copying the source photo and having it go all the way along the bottom.

And then there was the tinkering: a second, smaller shape in the trees on the left, some white highlights, a bit of salt that was supposed to make the roofs interesting but instead gave some texture at the bottom, some more impressionistic colours on the white (enough pure transparent yellow to make it shine), some shadows and contour lines, some hard to see scratches for tiles.

And I quite like what I ended up with.  The sky and the trees are magnificent.  I like how there's extra detail in the trees on the right to bring them forward a bit.  The white walls and the spire have interesting colours in them.  But those dark roofs, despite including some interesting colours are a bit too dark.  But, yes, this one's going up for sale.  It's so hard to go wrong with these colours.

Monday 8 August 2022

The Landscape Painter's Workbook: Mitchell Albala - Book Review

Now here's a book I've been looking forward to. It's Mitch's second book.  The first got rave reviews but was very oils focused.  This one is supposed to be relevant to all types of media, so was an easy choice for my wishlist.  It's a 176-page paperback.

Before we talk about content, let's talk about style.  A quick flick-through shows some great paintings by lots of different artists, so it's immediately clear that this book's going to be inspirational, even if I didn't read a word.  The flick-through also suggests that this book might be a bit short on words but that would be most unfair.  What words there are in this book really pack a punch.  It's not crammed with lots of little tips like a Liz Chaderton book: instead it's made up of a small number of huge, game-changing ideas that Mitch gives himself time to explain.  More on that when we get to content.  Most chapters have an exercise of two for the reader at the end and I may try some of these.  They're not all painting exercises though: some of them involve putting tracing paper over other people's paintings and analysing them with lines, blocks and arrows,  In terms of voice, I don't hear much personality or passion coming through but I don’t hear a dalek either.  Instead, there's a sense of gravitas in everything Mitch says.

Let's talk content.  The first chapter is on thinking in terms of shapes and I've not read a better explanation than Mitch's.  There's stuff in here on values too, but whereas other authors put more emphasis on values, Mitch puts more emphasis on the shapes.  The fourth chapter, on notan, builds on the first chapter.  Notan at first looks like a two or three level value plan.  So black and white or black, white and grey.  But the thing is, these notans aren't there to help us plan and understand values; they're there to help us plan and understand shapes.

The second chapter is an interesting one on choosing the rectangle that you're going to be painting.  Not just which cropped out bit of a photo but whether to paint it in landscape, square or portrait format.  All really useful and thought provoking.

The third chapter covers a couple of composition staples: variation and leading the eye.  There's not much new here but a new explanation is always useful, especially on leading the eye, which is such a difficult concept to understand, let alone apply.

Then, after the chapter on notan, the rest of the book is about colours.  First there's a chapter that tells us that paint can never replicate sunlight and that we need to use tricks to get the feeling across.  I can’t lie: this was the most disappointing chapter of the book.  I think Mitch's ideas needed more room to be developed.  If this chapter could have been extended from 10 pages to 20, I think it could have been another marvel.

Then we have a chapter on colour strategies.  What an eye opener!  My idea of a colour strategy is to choose which colours to use and maybe do a value plan.  Mitch's idea of a strategy has three elements to it: the colours (eg similar colours or complementaries), the values (not the value plan with thumbnails but the choice of what range of values, whether dark or light will dominate, etc) and the saturation (bright colours or neutralised colours).  He shows us lots of different paintings based on different strategies.

Then there's a chapter on colour groupings.  Something that's of more interest to the abstracty landscape artists like Mitch and like Tom Hoffmann.  We're shown paintings that can be divided up into shapes but where the shapes can be sorted into colour groupings.  So maybe there's a painting with blues, purples, oranges and yellows, in which case you could divide the colours into a blue/purple family and a yellow/orange family.   Maybe my palette would have one set of colours mixed at one end and one at the other.  And all the usual composition rules apply to the colour groups, like the groups all needing to represent different proportions of the painting.  Not something I've ever thought about before but if I keep painting white churches surrounded by greenery in front and behind, maybe I should.  It's also in this chapter that Mitch talks about "colour keys" and likens paintings to music.  What Mitch calls colour keys aren't the same as what I call colour keys, so be careful out there.

And finally there's a chapter on palette strategy, which is something that comes much closer to what I call colour keys.  There's not much new stuff here but if this chapter wasn't there after so much discussion about colours, then I think it would have felt a lot like there was a hole there.

Before we get to the scores on the doors, the names on the frames, one other thing.  Throughout this book, Mitch describes purpley blues as cool and greeny blues as warm.  At first I thought this was just a mistake, with cool substituted for warm or the other way round, but he keeps coming back to it.  This will annoy a lot of readers.

So, on to the final verdict.  This isn't a book for beginners.  The ideas in this book aren't the sort of thing that everyone should know.  They're the sort of thing that you put in front of experienced artists who can recognise that this is something that's not been seen before.  I'm thinking here about the colour strategies and the notan in particular but also, to a lesser extent, the colour family groupings and some of the stuff on landscape format vs portrait vs square.  And then, to bulk out the rest of the book we have some (valuable and different) takes on well trodden composition topics.  But you know me.  I like books that make me think differently, especially if they keep me thinking when I'm driving, walking, sleeping,…. Just when I thought there were no more authors out there that would make me think differently, along comes Mitch Albala.  It's a fiver.

🎨🎨🎨🎨🎨

Saturday 6 August 2022

David Gilmour

Back on the coloured pencils and I thought I'd try doing a portrait of David Gilmour.

I tried something different today: as well as using a grid, I did my original drawing upside down, working from an upside down source.  This is supposed to be a pretty good way to lock out the left side of the brain and let the right side do all the work.  So you draw what you see rather than drawing the shapes you think you're supposed to draw.  It generally worked well, although David's left eye ended up lower than expected and had to be moved.  While I know the grid can't be blamed for this, I'm going to have a go without the grid next time as the grid may have let a little bit of the left side of the brain into the party.

My style with the coloured pencils has already made itself known.  I do multiple layers with all sorts of weird, impressionistic colours and then burnish it at the end with a white or flesh coloured pencil.  This is the way it's going to be for a while.

Today I start the colouring with the ear and ended up with some quite heavy colour, which ended up causing me problems later as I needed to match this with heavy colour on the face, which meant having to add lots more colours, even after I'd ended up with something that I'd have been really happy with had I not already set the rules with the ear.  So the face colours are definitely heavier than I'd have liked.  Darker  colours there too.

The likeness isn't great today.  I can see a bit of there but if I didn't know who this was supposed to be, I would have been wondering whether it might be David "Bumble" Lloyd or Sven Göran Eriksson.  I like the eyes though: a highlight on the iris and pupil and shadows of the eyelid on the white work wonders.  Overall, though, not enough of a likeness for this one to be put up for sale.

Friday 5 August 2022

Avebury Stones

I was ready today to take a second stab at painting something with the Schmincke Shire watercolours.  I learned some lessons from my first go that I've incorporated into this one.  First, the set needs to be supplemented by a red and by a blue that's suitable for skies.  So my supergranulating palette of 12 now includes the Shire and tundra sets plus rose dore and cerulean blue.  I think those two extra colours could come in useful for the tundra set too.  There was a transparent yellow in one pan that I thought at one point might complement the tundra set but I now know better.

The second lesson was subject matter.  These Shire colours need fields and rolling hills to bring out their strengths.  A clearing in some woods wasn't going to cut it.  So I mentally moved to middle England and settled on these stones at Avebury.  Avebury apparently has several stone circles.  I don't know which one this is, which is unfortunate, but to be honest it's the hills that are more important here as they'll be where the supergranulators work.

After putting down a pencil drawing, I started with the masking fluid, as usual.  I masked out the stones and did some spattering over the foreground, the hill behind it and a couple of fences.  I had in my head a value plan where the stones would be light, standing out against a dark hill behind them but you'll see this plan had to be changed.

Once the masking fluid was dry, I worked my way down the painting.  The sky was in cerulean blue (Shire blue is too green for shies) with some clouds left white and some shire grey under the clouds.  Then came the trees, where I had fun creating a variety of greens from the five shire colours and the rose dore.  I wanted the greens to all be distinct against each other and for them to generally be darker in the middle of the painting and lighter at the edges.  The painting was looking like a "colouring in job" at this stage, which may well be the way to go with both sets of supergranulating colours.

After the trees, the house and the small shapes in front of the house, I moved onto the big land shapes.  For the hill and the grass under the stones, I used the Shire colours and the rose dore and tried to use as little paint as possible to aid the granulation.  The hill is definitely the best of these shapes, with the granulation coming through clearly.  In the grass under the stones, I've subtly made things darker with Shire grey where there should be shadows.  I have light coming in from the right whereas my source photo has it coming from the left so I hope this isn’t a Westward-facing view.  The shapes at the bottom had some rose dore and cerulean blue thrown in to keep them interesting and I think I managed to stop before creating mud.  In fact all those land shapes have ended up interesting, with lots of colour variation.

At this stage, I spotted a composition problem.  All the tree shapes at the top were similar sizes.  So I added the line of greenery along the top of the hill.  Is it a row of bushes?  Or the tops of some trees behind the hill?  Don't know - you can choose.

After the masking fluid came off, I painted in the stones and the fences.  The fences have a bit of Shire grey on their shadowy sides, especially wherever they're in front of light values shapes.  For the stones, I was faced with a value plan problem.  The Shire set is quite light valued (with the exception of Shire grey) and I didn’t want light stones against a light background.  So I made the shadowy sides really dark to contrast against the colours behind them.  I wanted the light side of the stones to be really light but leaving them white looked wrong, so I dropped on some really watery shire grey with a bit of cerulean blue and rose dore in places for the most subtle colour effect that I've ever painted.

Finally, I stabbed in some grass and some colour with Shire grey, cadmium red and cadmium yellow.  The grass around the stones needed a bit of texture in places and the painting as a whole needed some bubbles/acidity/not sure what the word is.  And that was me done.  I could have added some shadows to the left of the stones but I don't think this painting needs them, in the same way that choppy seas don't need reflections.

I like this one and it's going up for sale.  High spots for me are the gaps in some of the trees at the top and the way the rose dore complements the Shire colours.  I definitely feel closer to understanding these Shire supergranulators and knowing when to use them.

Wednesday 3 August 2022

Clearing In Newington Woods

So, after all that swatching, here's my first go with the Shire supergranulating colours.  I trekked a mile or two across some fields in the blazing sun to Newington Woods, where I thought this little clearing might offer the opportunity for those Shire colours to shine while also letting me stand in the shade.  With all the sky blotted out by trees, the lack of a sky colour wasn't a problem.  The main colours were the Shire five plus rose dore.  Four opaques came on to offer support at the end: cadmium red, cadmium yellow, titanium white and sepia.

I started by masking out the benches, which makes it all the more odd that I didn’t go into this painting with a proper value plan, instead hoping that some shadows would make everything look sunny and that the values would take care of themselves.  I also spattered on some masking fluid, trying to only put it on the backdrop of trees.

After that, I worked from back to front, starting with an underpainting.  I,m not sure multiple layers are the best way to acticvate the granulation, so that my have been a mistake.  It may also have been a mistake to have too big a foreground: I was struggling throughout this painting to make the foreground interesting.  I ended up putting on too many layers everywhere, especially in the shadows on the right of the foreground where I couldn't decide in the best shadow colour.

I also struggled with the benches.  The shire yellow wasn't bright enough to show off the sun and I dismissed the idea of leaving white highlights a bit too quickly.  White highlights (and some light values) would have been great for making the benches stand out against the grass.  I just couldn’t bring myself to add white highlights to a bench that was mainly in shadow.

To make things look more interesting, I resorted to dibbing in some opaque whites, yellows and reds.  I also put in some bigger yellow dabs along the top to look like sunlit leaves, dabbing in a bit odd shire blue on top of them to give some greens and a bit of variety.  I also had to bring in the sepia to help make the benches stand out, painting in some very dark, opaque shadows.  I used the sepia in some other places too, just to balance things out.

There were a couple of things that worked out well today.  The trees in the background look good, some of them even looking cylindrical and three dimensional.  The other success was the decision to include rose dore in the palette.  It did a great job in calming down the greens in some places while vibrating against them in other places as a complementary colour.

Overall, though, this one goes down as a flop.  Too many overworked layers destroying the granulation, the lack of a value plan.  The lack of value contrasts, apart from maybe the light bench against a dark background at the top.  It’s not a great first outing for the Shire supergranulators, although I did learn that rose dore belongs with them and that (based on limited evidence) they seem to work better for trees than for grass.

Oh, and this was a first proper outing for my new art backpack.  Everything fits in (apart form the bottle of water that I carry separately) and it was comfortable in my back, even roasting under the midday sun.

Supergranulating Swatches

Before having my first go with the shire supergranulators, I thought I'd swatch both of my supergranulating sets.  This is in the back of an old painting; I think it's on cold pressed (aka not) paper.

First there's the tundra set:

- tundra green is a mix of pthalo turquoise and Mars brown
- tundra blue is a mix of French ultramarine and raw umber
- tundra violet is a mix of French ultramarine and Mars brown
- tundra pink is a mix of French ultramarine and potters' pink
- tundra orange is a mix of yellow ochre, potters' pink and raw umber

These all look great in the swatches, with the pink and violet being especially interesting.  From experience I already know the orange to be a brown with low tinting strength.  The green is quite a dull one but has its uses; I just need to remember to not use it for trees, for which it doesn't work.

In my supergranulating palette, I have these five colours supplemented by transparent yellow, the two ideas being that yellow is opposite violet and that transparent yellow, being cool, might have a chance of creating some greens that could work with trees.  After trying this out once, I now know that cadmium yellow might be a better choice, with its opacity being key to making greens stand out.

Then there's the shire set:
- Shire yellow is lemon yellow deep plus (maybe) ultramarine violet
- Shire olive is lemon yellow deep plus cerulean blue
- Shire green is lemon yellow deep plus viridian
- Shire blue is lemon yellow deep plus French ultramarine plus cobalt green deep
- Shire grey is lemon yellow deep plus cobalt blue deep plus Mars black

The colours all look interesting, although it's missing a good sky colour, the olive and green are a bit in your face (so maybe needing a red to neutralise them) and it's just all very green, with the blue and the yellow bath bordering on green.  It's going to be difficult to get these to work without involving extra colours.

In my supergranulating palette, I have these supplemented by rose dore, a warm red that will complement and maybe neutralise a very green collection.  I've found that this works as you'll see in my next post.

One thing the two sets have in common is that they seem to need some help from opaque colours to make shapes stand out from each other, so cadmium red, cadmium yellow, titanium white and sepia will see a bit more action than they have done before.  As for the palette that these tins are stored in, the rose dore is definitely worth its place but the transparent yellow could be replaced with cerulean blue just to give me something I can paint skies with.  While the five tundra colours can probably stand alone (with maybe a bit of help from opaques), the shire set does need to be supplemented by a red and a sky blue as well as not being averse to some opaque intervention.

At this stage I'm preferring tundra to Shire.

Tuesday 2 August 2022

Paul Shane

I've had my eye in the late Paul Shane for a while.  In particular the Paul Shane who turned up on Pebble Mill that time to sing You've Lost That Lovin' Feeling.  The more I watch that video, the more I like it and the more I appreciate the effort that Paul put into it.  He does still get some stick for it but, Jones toy, ot's those backing singers that deserve it, not Paul.

Anyway, I dug out the coloured pencils today and followed a similar process to that for the Big Sam painting.  One thing I did different with the face was to burnish it earlier, after I'd only put down some colours with the edge of the pencil and not darkened it by using the point.  Another thing I did differently was to burnish the face using beige red rather than white.  Beige red is a flesh colour and I thought it might drag my impressionistic colours back to something realistic, which I guess it did.

And I do like what I've ended up with.  Most importantly the likeness is there, and is still there when you cover up Paul's distinctive hairdo.  The eyes, the hair, the colours and the hard edge along Paul's left forehead all work.  This feels like a fitting tribute to a nice guy (somewhere there's a version of the interview in which Paul's interviewed afterwards) and I'm feeling proud.  This one's up for sale.

Portraits might become my thing in coloured pencil.  I'm already to see whether there are any other colours that I could use to expand my set.  I'll probably wait until I need to buy replacements before doing this.  That might not be too far away, with black, white and beige red already looking shorter than all my other colours.